
Today I want to share my newest soap creation with you, the cold process goldenrod & honey soap.
We have been using cold process soap in lieu of liquid soap and shower gel for over ten years now. But it wasn’t until last year that I started making the soap myself instead of purchasing it. A couple of months ago I already wrote a post about how to make cold process soap and shared the oil composition I generally use for all of my soaps. You can find the post here.

This post contains affiliate links. I may earn a small commission if you use these links, at no cost to you. As an Amazon Associate I earn from qualifying purchases. I only recommend products that I find value in myself. See my full disclosure here. Thank you for your support!
This post is a continuation of the first post because this time I will share a more specific recipe with you. Since I always strive for a natural option, I only use natural colorants and essential oils for my soaps.
Special Ingredients: Goldenrod & Honey
For this soap I decided to rely on a tried and true dye plant that grows wild in abundance in the area where I live: goldenrod. I have used goldenrod for dyeing yarn numerous times and am always amazed by the vibrancy of the color goldenrod can produce. It yields the most bright and happy shades of yellow.

The second special ingredient in this soap is honey. Adding honey to a soap recipe helps to increase the lather. It also acts as a humectant which means that it is a hygroscopic substance used to keep things moist. But I didn’t just use any honey from the supermarket, I used honey from our own bees. My husband started being a beekeeper in spring of last year and this was the very first batch of honey we collected.

Precautions before Getting Started
Making Cold Process Soap requires the use of sodium hydroxide, also known as lye. Lye is a highly caustic base that can cause severe chemical burns. Therefore, it is indispensable that you familiarize yourself with the soap making process in depth before making your first batch of soap and take the necessary precautions. Additionally, always wear safety glasses, protective gloves and long clothing made from natural fibers to protect your skin. Always make sure to not breathe in the fumes of the lye solution and only work in a well ventilated area.

To get started, I can highly recommend the video tutorials from Anne-Marie from Brambleberry. She has a whole series on YouTube about the basics of cold process soap making. In these videos, she discusses the topics of lye safety and ingredients, basic terms, fragrances and colorants. Additionally, she also has a website where you can get a lot of soap inspiration and purchase soap making supplies.
In short, making cold process soap involves the conversion of an oil into soap in the presence of lye. This process is called saponification. Depending on the ratio of lye to oil, the soap can contain more or less amounts of oil that hasn’t been saponified. In soaping terms, these are called superfats. Superfats (so called esterified fatty acids) contribute to the nurturing quality of the soap. In addition, they also affect the softness of the soap. Ideally, soap is hard enough to not wash away too quickly and dry in between washes and contains enough un-saponified oils to have a nurturing effect.
Cold Process Goldenrod & Honey Soap Recipe
| 450 g | Olive Oil | |
| 250 g | Coconut Oil | |
| 150 g | Rapeseed Oil | |
| 150 g | Shea Butter | |
| 335 g | Water (distilled) | |
| Lye | the exact amount depends on the amount of superfat you want to have, I usually go for 6% which means you will need 137,07 g lye | |
| Essential Oils | 12 g lemon balm essential oil, 9 g rosemary essential oil, 5 g palmarosa essential oil, 5 g lavender essential oil | |
| 1 Tbsp | Honey | |
| 40 g | Golderod Flowers | about three branches |
| Mixture of dried flowers |

How to Make Cold Process Soap: Materials
| Safety Equipment | protective glasses, gloves and clothing |
| Stick Blender | for mixing the lye water with the oils to kick off the saponification process, the foot should be made out of plastic or stainless steel |
| Pot | stainless steel |
| Glass Jars | for weighing sodium hydroxide and dissolving it in water. I use these small canning jars but any old glass jar will work. |
| Scale | this is the one I use |
| Spoons | stainless steel or plastic |
| Mold | you can re-use an old tetra pak – the ones that plant-based milks usually come in – or a round potato chip box. In addition, I also use these silicon molds. You could also use a standard rectangular silicon mold like this one. |
| Towel | to isolate the soap |
Instructions on How to Make Cold Process Goldenrod & Honey Soap
- Put 40 g of goldenrod flowers (about three branches) in a pot and fill it with about 600 ml of distilled water. Slowly bring the mixture to a simmer and heat it for an hour. Let it cool down and filter off the plant material. This solution will be used to create the lye water later on.

- Melt the solid oils/butters. Add the liquid oils. Then let them cool down to room temperature.
- Measure the (cold) water (created in 1.) and sodium hydroxide separately. Slowly add the sodium hydroxide to the water, stir. The solution will heat up quickly. Wait a couple of minutes before adding more sodium hydroxide. If all the sodium hydroxide is dissolved, let the solution cool down to room temperature.
- Measure the essential oils and have them ready.
- Pour the lye solution slowly into the oil mixture. Then carefully put in the stick blender, try to avoid creating any air bubbles. Next, add the honey and start blending.
- Alternate between blending and turning the stick blender off (and continue stirring by hand) in order not to overheat it. It will probably take a couple of minutes for the saponification process to start. You will notice that the solution will change in consistency. Add the essential oils. Continue blending.
- If you see some “trace” (I recommend watching some explanatory videos to know what to look for), the soap is ready to be poured. Now slowly pour the soap into the molds. Add some dried flowers on top. Then you can put the soap in a quiet spot. Since the soap contains honey which will heat up the soap it is not necessary to wrap the soap in old towels to foster gel phase.

- Wait at least 24 hours before checking on the soap. I usually wait a couple of days up to a week. If you have difficulties getting the soap out of the smaller silicon molds, you can freeze them for a couple of hours. Large chunks of soaps should be cut into pieces now and stored in a dry place with good airflow.
- The soap will need six to eight weeks to cure and harden. During this process, it will lose water and the pH will drop. After this curation period, the soap is ready to be used.

Tips to Make Cold Process Goldenrod & Honey Soap
- If you add dried flowers (or any other kind of topping) you have to lay the soap on its side to cut it. Otherwise, if you cut from the top down, the topping will be pushed down by the knife and create some markings on the side of the soap pieces.

- If you don’t want to purchase a soap mold you can easily create your own. I used an empty milk box to pour part of the soap into. Granted, it didn’t hold its shape perfectly but since this soap is for our personal use only, I don’t mind that at all.

Cold Process Goldenrod & Honey Soap: Conclusion
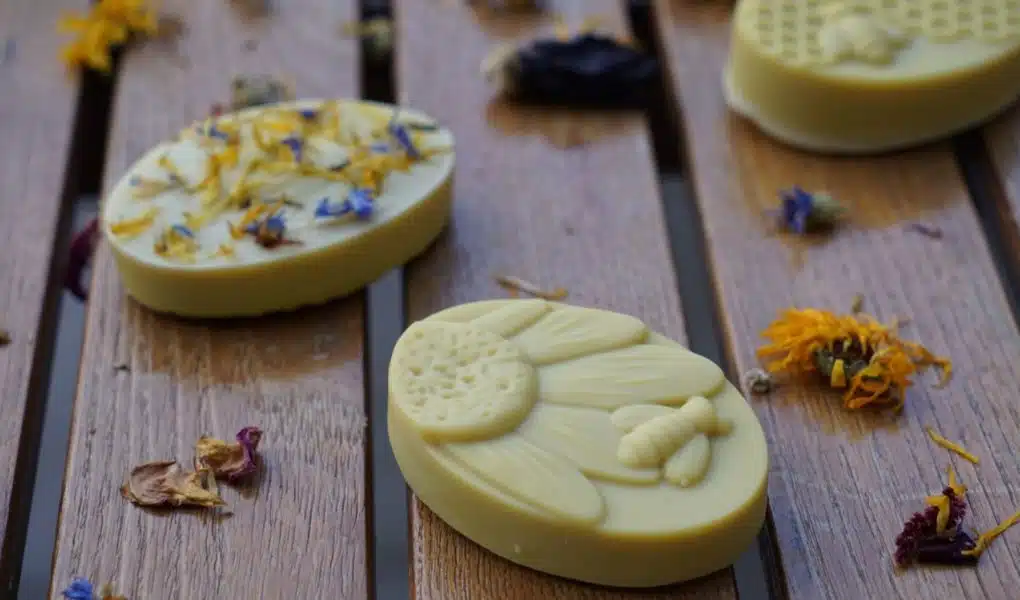
I am very happy with how the soap turned out. It smells mainly like lemon balm which I quite like. I used up a lot of remnants of essential oils, hence the wild mixture. The coloring experiment was definitely a success. Only three branches of goldenrod flowers were able to dye the soap a lovely yellow. It its very interesting to me that the soap from the small molds turned into a consistent light yellow. The soap that I poured into the milk box partly went through gel phase and is light yellow on top and darker below. As you can see in the pictures, the soap was a very bright vibrant yellow when I poured it and got significantly lighter after a few days.

Do you make your own soap as well? What is your favorite recipe? Come share in the comments!
Pin It For Later

Did you find this blog post valuable or helpful? If so, you can support my website by buying me a coffee below, purchasing my knitting patterns or yarns or simply by leaving a comment. Thank you!


Beautiful results! These seem perfect for the holidays being gold, but they would work any time of year. Have you ever tried adding scent? I like the oils from Bulk Apothecary (https://www.bulkapothecary.com/pure-therapeutic-grade/) and am wondering which ones would complement the goldenrod and honey scents, or if they are better left as is?
Hi Joshua,
Thank you for your comment! I generally scent my soaps with essential oils. Personally, I really like rosemary, lavender and lemon balm essential oils.